Tuesday, November 25, 2014

Bring a Little Sunshine to a Cloudy Fall Day

Good Morning,

We had a few rainy, cloudy fall days recently in north Texas. (Yes it does occasionally rain in Texas) These were perfect days for playing with Creative Paperclay. Instead of my first thought of  holiday themed creations, in the end I chose to bring back the sunshine.This was created on a 8x8 canvas using creative paperclay for the flowers and background, DecoArt texture glass for the clouds, Decoart media paints, and pigment powders on the flower petals and leaves. #creativepaperclay#canvas#decoart


Saturday, November 22, 2014

Helping My Creative Community


 Hello !
  I wanted to ask a favor of my friends. My son is at a start up weekend competing for prizes to help his start up Play without boundaries. Could you take a short 8 question survey on this link to help him? Sharing with friends would be helpful too. Thank you sooo much !!!!!!! #playwithoutboundaries
 
http://www.facebook.com/l.php?u=http%3A%2F%2Fwww.playli.co%2F&h=PAQG5Y9vq


Holiday Platter with Americana Decor Chalky Finish Paint


Ahhh, the weekend is finally here

 Today I wanted to share a holiday platter I just finished using Americana Decor Chalky Finish paint.
The manager at my local Home Depot went above and beyond and cut a square piece of wood into a circle for me, he even drilled the holes for the handles too!


 Americana Decor Supplies 
Americana Decor Chalky Finish Colors
* Rouge
* New Life
* Lace
* Serene
* Relic

Americana Decor Crème Waxes
*Clear
*Deep Brown
*Ultra Matte Varnish

Other
*Cafe Paris Stencil by DecoArt
* Black Permanent Marker

I painted three circles, each a different color. The color inspiration came from the sheet of vintage card stock behind the paint.       Hint: Wait at least 10 minutes between coats of paint.


I secured the stencil with painters tape then used a small stencil brush to apply the paint.


I wanted to add a simple scallop around the circles. I made a half circle template by using a wooden candlestick. I made a mark on both sides at the halfway mark. I lined up the marks on each side of the candlestick and traced it with a white charcoal pencil.     Hint: I used a charcoal pencil because you can paint over it and it wont show through, easily remove if you make a mistake, and easier to see over dark colors.


 I added a few more details using a black permanent marker. I let the piece sit overnight.  In the morning I applied a clear and dark wax.

  When dry, I set it with an ultra matte varnish to keep that matte chalk finish look. 
I let it set overnight and the next day I attached the handles.


*** I have attached a helpful video on how to apply the waxes.


There are a number of great videos DecoArt produces to help inspire you, apply their product lines, and to give some wonderful tips. Check them out on youtube. #chalkyfinishpaint  #christmas #christmas platter #decoart #americanadecor #stenciling #vintagelook

Shari

Friday, November 21, 2014

Friday Afternoon in the Studio


I've been so busy in my studio, I just realized I haven't posted here all week! In the next few weeks I will be sharing some of what I have been working on.

This morning I worked on holiday gift tags.Here is a small sampling of what I did. The images were purchased from Retro Cafe Art .

Can you believe how close Christmas is!

Sunday, November 16, 2014

Creatively Bringing the Family Together

Happy Sunday!

I am all about supporting and showcasing my creative community. Today I am excited and proud to be sharing my son Jim's start-up company, Play without Boundaries. If Skype and on-line gaming had a baby this would be it. Wondering what it's all about? www.playwithoutboundaries.com or view a video at https:vimeo.com/106148331

Play without Boundaries was recently at Atomic Candy in Denton, Texas where children and parents were helping out with some market research. 


Friday, November 14, 2014

My Friday Finds

Good Morning!!

It has been sooo cold in North Texas the last few days! While bundled up in my favorite blanket, with coffee in hand, I have been floating around the net looking for one night stands. WAIT !! Not that kind of one night stand! These are art projects that take a night or a weekend to complete. These creative fillers are quick and can help you break a creative block, feel a sense of accomplishment, or are just plain enjoyable.

This one is going to also serve a purpose for me....what to do with all those lovely bits and pieces of gelli prints that I can't bear to toss. I found this idea on a post at the  GelliArts Facebook Page

Photo
I never want to forget the artist who created these follow her link here.
https://www.facebook.com/pages/Torn-Paper-Paintings/121219131233337


Wednesday, November 12, 2014

Chalk Paint Palooza


What's in the studio? Lots of DecoArt chalk paint that's what!
  
  A little preview of a few pieces I am working on this week. Check back for the finished projects along with tutorials to help you create your own one of a kind pieces. 
            #DecoArt #chalkpaint #christmasplatter #weatheredwoodlook #stenciling #shutterproject                                                                                                                               
Vintage look Christmas chalk paint


Christmas platter

               
Weathered wood look
                                                                                                
Stenciling      


Monday, November 10, 2014

Art Created for your Soul


 Good Morning!

Today I am featuring a fellow artist Melanie Retzler Statnick who also writes for mixedmediaart.net. She has created meditation reflection cards. Take a look at her tutorial showing how you can  make these too. What a good way to start the day. :)

 Shari


http://www.mixedmediaart.net/mixed-media-inspiration-2/get-line-make-art-meditation-cards

Thursday, November 6, 2014

To Grandmother's House We Go!


Good Morning!

Over the river and through the woods to Grandmothers house we go! 
 I loved singing that song on the way to Thanksgiving dinner as a child. I decided I should use these cute little wooden houses as a Thanksgiving project.

I found 4 small wooden houses at Scrap Denton's creative reuse store the other day. At the time I didn't know what I would use them for but now I do. I made place card holders for the Thanksgiving table. I shot a few pictures while making them I thought I would share with you.


You can use these for name place cards, added to a centerpiece , or to sit along side of a (for example) dip to let your guest know kind it is.

Shari

Wednesday, November 5, 2014

My First Christmas Project of the Season


Hello!

Today I am going to share with you my first Christmas project of the season. It also happens to be my submission for the altered art design team for The Robin's Nest.  So excited!!


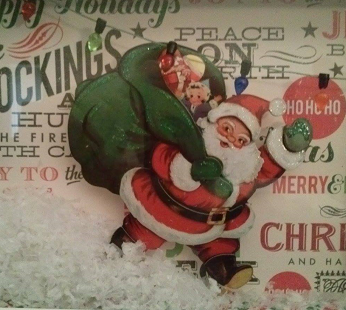
I love seeing the excitement of children as they envision Santa with his big bag of presents coming to their house. This was my inspiration for this tutorial.


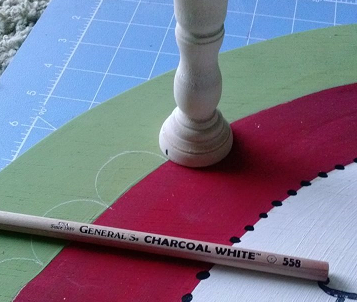
1. Choose a shadow box, (for this project I used a 5x7) paper, stickers, washi tape, Christmas snow, and any other embellishments you want to add based on your theme.


2. Take the back off of your shadowbox and use it as a template for cutting your paper background.


3.Add your images. Tip:  My sticker had 3d foam on the back, but I added more on top of the existing. This helped give it a more dimensional look on the page.


4. I used washi tape to decorate the outside frame and inside edge of the shadow box.


5. Add any other elements you want to add to the background or edges. This is how I attached the string of small Christmas lights for mine. I showed the washi tape off a little so you could see it. For the final I lined up the pattern so that it is seamless.


6. Next add the snow in one of the corners of the shadow box. After you attach the back you can tilt the box to distribute the snow where you want it.


7. Put the shadow box back on, turn over, tilt and shake to distribute the snow and you are done!

 Doesn't Santa looks like he is walking through the snow?


You can hang this on the wall, sit on a side table, or add it to a table scape. I am having so much fun with this quick and easy project I am going to make more.

 Here is another one I finished. The alphabet stickers I added to the glass to give it more interest. Next I am going to try a baking theme for the kitchen. Fun, Fun, Fun!


Hope you enjoyed this project as much as I did.  I would love to see what your creative minds have come up with. Feel free to post to my blog. #chatteringrobins  # therobinsnest  #christmascraft
 #shadowboxideas

Shari

Tuesday, November 4, 2014

Coffee is Brewing and Jammies all Day!

 Good Morning!

Finally the rain has come to North Texas which means it's a perfect day to create! There is so much going on in my studio over the next few months.

Today I am finishing up a piece for submission to The Robin's Nest Chattering Robins altered art design team. I will be posting that tomorrow so come back and check it out. I am working on 2 pieces for the Scrap 30 for 30 art show being held later this month. In December I have a tutorial publishing for Mixed Media Art, and will be a be a featured artist for Melanie Statnick Art. Over the next two months I will sharing 4 projects I am creating for DecoArt.

 I have been so very blessed with so many opportunities to do what I love.

Coffee is ready and I'm ready to get my hands into some paint!


Saturday, November 1, 2014

A Day of Giving Back

Good Morning! 
 
Today is a volunteer day for me. I am going to be helping out at the annual DIME Handmade Harvest.  This is an opportunity for me to help my creative community. I love seeing all the veteran and newbie artists handmade creations, seeing dear friends, and make some new. I love my volunteer work!

 If you are not in the Denton,Texas area many of these artists have online stores. There is something special about a handmade gift, check out the links below.


 The DIME Handmade Harvest is an annual event that celebrates the best of handmade!

Join us on November 1st from 10:00am-4:00pm at the Center for Visual Arts (400 E. Hickory St.) to shop handmade goods from over 40 makers. Some DIME Store faves will be there, alongside new faces and out-of-towners with talent!

Shop the makers, eat from some of your fave food trucks, and make sure to get there early-- the first 50 shoppers get a goody bag full of free handmade goodness!

Tickets are available in advance at The DIME Store for $2 or at the door for $5. You can also purchase will call tickets online at the link above.

For a full list of participating makers (and sneak peeks into their amazing wares!), follow this link! http://bit.ly/1Bj4ZgU